
Reproduced here with kind permission of reddit user KenaiKanine his guide will teach us how to make our very own VideoCD’s for the Saturn – or for playing in any VCD player!
The original guide, conversation and updates can be found HERE
The Sega Saturn VideoCD card(otherwise known as an MPEG decoder) is an expansion card that enables your Saturn to play VCD’s – or VideoCD’s. Given you own the expansion card, this guide will teach you how to create and burn VideoCD’s for the Saturn, while taking advantage of the Saturn’s higher bitrate abilities – or you can create a VCD with standard bitrate for playing in any VCD player.
Why?
A lot of the information out there for creating VCDs is extremely old and also uses XP-era software – some of which don’t work on modern Windows, or are limited in some way(filesize, bitrate, etc). This guide should be a straightforward guide to create VCD’s for both the saturn and for regular Videodisc players, all with software that works on Windows 10/11.
It will be updated as better methods are figured out, as currently we are converting the video twice. Modern support of the MPEG video format is a bit tricky.
Tools Needed:
- TMPGEnc (mirror1) (mirror2 SS:UK) (Includes KenaiKanine’s custom bitrate config – more info below)
- VCDGear (mirror1) (mirror2 SS:UK)
- VLC Media Player
- IMGBurn (or any other software for burning .bin/.cue files)
What we are doing(In short):
- Converting file to MPEG with VLC
- Converting that MPEG to yet another MPEG with TMPGEnc
- This MUST be done because the MPEG VLC spits out doesn’t like the main program we use to make the burnable VideoCD. Not sure why. It will spit out errors otherwise. My custom config file for TMPGEnc will let us change the bitrate to whatever we desire.
- Use VCDGear to create a BIN/CUE file to burn to a disc
- Use IMGBurn to actually burn the video
Step 1:
Download all the above programs. VLC and IMGBurn need to be installed first. TMPGEnc and VCDGear is standalone, so extract those folders and put in a place that’s useful to you.
Figure out what movie or show you want to add. Keep in mind, VCD’s can only hold about 60-80 minutes of video per disc, so you may need to burn multiple discs for the same movie. I’ll go in to making parts later on. Download the video file you want – as long as it can open in VLC, you should be fine.
Step 2:
First, we’ll use VLC to convert the video to the format/size/bitrate needed. Open VLC Media Player, and in the top left go to Media > Convert / Save. In the popup that comes up, click the +Add button, and navigate to your video file.
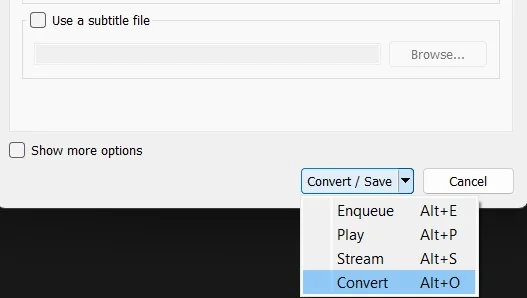
Once you have it added, click the down arrow at the bottom next to Convert / Save, and click “Convert”.
This should open up a dialogue box. In the box that opens, click the “new” icon to create a new profile. If you have already created a profile before, you can simply select it from the dropdown, set an output file name, and click start. If this is your first time, we need to create a new profile for VCD.
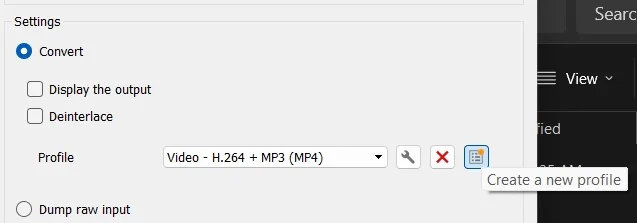
At the top of this new window, name it anything you’d like! You can have different presets for different bitrates.
Under the “Encapsulation” tab, click “MPEG 1”. Next move on over to the “Video Codec” tab.
Click the checkbox that says “Video” at the top if everything is greyed out.
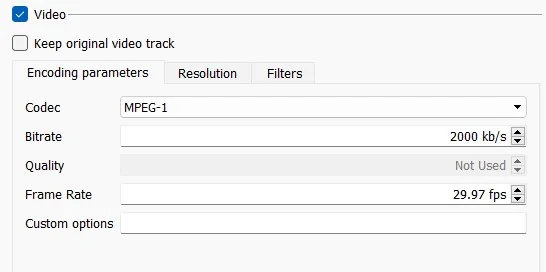
Here is where we specify the specific things for the video, such as bitrate and size.
What is bitrate?
The bitrate is essentially how much data is being passed through per second. Higher bitrate = better quality, in general.
Almost all VCD players run at 1150kbps – However, the Sega Saturn has a 2x speed drive, meaning we can theoretically get away with 2200kbps! If not more(not suggested). I usually keep my videos locked to 2000kbps, though, but feel free to experiment.
Make sure the codec says “MPEG-1” at the top. For the “Bitrate” tab, I would suggest 1800-2000kbps.
** 3/15/25 EDIT **
You should actually set your bitrate quite a bit higher than your Saturn’s target bitrate for this step. It will help mitigate the lossy compression artifacts from re-encoding during the next step. You should aim for something like 5,000 kbps – you can probably go higher if you’d like though 🙂 Thanks u/SpecificPineapple122 for the suggestion 🙂 For some reason I overlooked that.
For the framerate, it depends on your Saturn video card. Certain VCD cards only work with NTSC or PAL video, and some cards work with both. Here’s a list of the cards and what region they support.
For PAL Video, the frame rate should be 25. For NTSC, it’s 29.97. Replace the text in that field with your frame rate.
Next, we are going in the “Resolution” tab(a sub-tab under the “Video Codec” tab in VLC).
The resolution will also depend on NTSC or PAL. For NTSC video, the resolution you’ll type in is 352px Width and 240px Height. For PAL it’s 352px for Width and 280px for the Height.
We are done with the “Video Codec” tab – Now we move on to the “Audio Codec” tab!
Make sure the “Audio” checkbox is clicked, and that the codec is “MPEG Audio”. For our bitrate, we will need 224kbps and make sure the sample rate is “44,100hz”
You can now click “Save” at the bottom left! We’re done with video settings. Now, we need to specify where to save the converted video. Click “Browse” under “Destination File”, and click “Start”. VLC should start encoding your media to proper VCD Format!! If it doesn’t start automatically, click the play button in the bottom right corner to force it to start. Wait for it to finish converting, and we’re done!
Step 3:
IMPORTANT: VLC will automatically name the file <whatever you named it>.mpeg1 – or sometimes it will keep the file extension the same as the file you converted.
We need to rename the file extension or it won’t show up in the next step. Rename it to <whatever you named it>.mpeg
Now that we have the proper format, we need to convert it to yet another MPEG file that our next program will recognize. It’s extremely annoying having to do this twice, however the video VLC spits out doesn’t work with the next program we’ll use to generate a burnable disc. To remedy this, we use the program TMPGEnc. I’ve included the download at the top, along with my custom configuration files for it.
What does my custom config files do?
By default, TMPGEnc doesn’t let you change the bitrate of VCDs, instead keeping it locked to 1150kpbs with a greyed out window. I simply edited some config files to let you change the video format to whatever bitrate you prefer.
Open TMPGEnc.exe. Unfortunately, this program is paid HOWEVER we can use it 100% free for 30 days. There are ways around this limitation, but that’s not for this sub to discuss.
There will be a trial dialogue when you first open it, just close that. After that, there will be a “project wizard” that auto-opens. However, we will not be using this. Hit the “Cancel” button in the bottom right.
You should be greeted with the main program, now. On the bottom, next to “Video Source”, click the “Browse” button. Navigate to the file you already renamed to .mpeg instead of .mpeg1 that VLC converted. It should auto-populate the “video source” and “audio source” to your file. Click “Browse” on “Output File Name” and select the place you want to save it to, as well as give it a name.
We are now going to load one of my custom config files. In the bottom right, click “Load”.
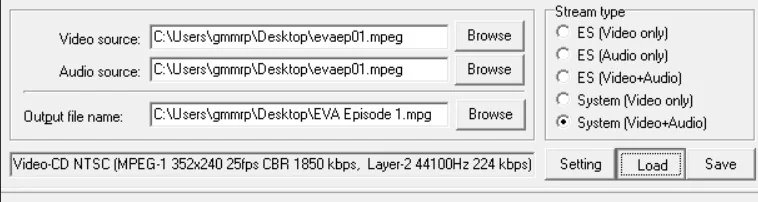
From here, an “Open” dialogue will appear. We need to navigate to the configuration file I made. This will be different depending on if you’re burning a NTSC or PAL video. The configuration file will be found in the “Template” folder, within the main TMPGEnc folder.
For NTSC, open the “VideoCD (NTSC) – Editable Bitrate.mcf” file. For PAL, open the “VideoCD (PAL) – Editable Bitrate.mcf” file. Make sure it’s one of these files, and not a Super Video CD file!
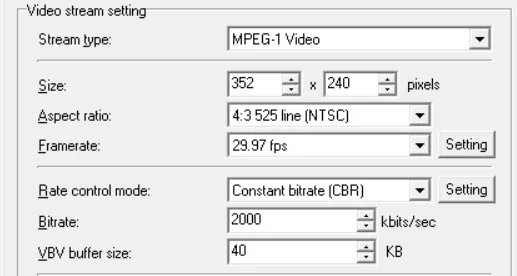
Once loaded, click on “Setting” A Window should pop up with a bunch of information. We don’t care about most of this, however, we only care about the “Bitrate” setting. Set this to whatever your video bitrate is. If you’d like the video to be viewed on any VCD player, make sure it’s at 1150kbps.
My movie/video is longer than 60-80mins!
If your movie is too long to fit in to a single disc, we’ll need to trim it within the program. While still in the “Setting” Menu, click the “Advanced” tab at the top. Next, in the list, make sure “Source Range” is checked and double click on it. From here you can adjust the playback slider to where you want your first disc to end. “Set End Frame” is where the first VCD will end, then you can export the first part of the movie in the following steps, and come back and export the rest. You’ll need to make sure “Set Start Frame” and “Set End Frame” is set at the correct point for disc 2.
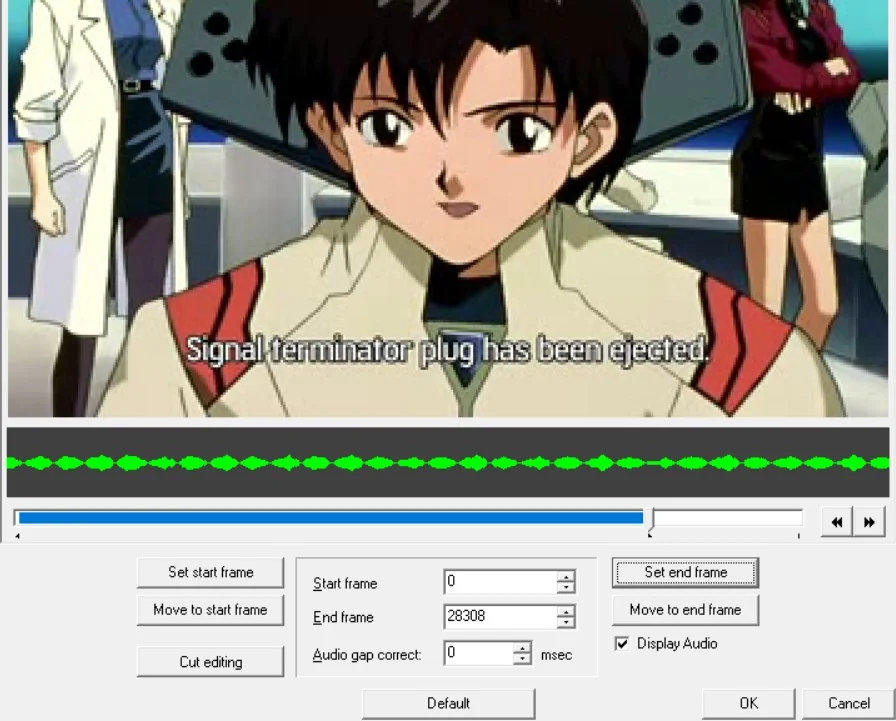
Once finished with putting in your bitrate and, if needed, selected the section of video you’d like, click “OK” at the bottom of the settings diaglogue.
Click “Start” at the very top left, and with any luck you should start seeing your video playing in the preview very quickly! Once it’s done, we’re almost there! Promise! 2 quick steps left.
Step 4:
Once you have your properly encoded .mpeg file(or .mpg, i believe TMPGEnc saves as .mpg, either one works), we are ready to create a burnable image. Open up VCDGear.exe from the VCDGear folder.
It should have automatically loaded the correct files for creating VCD images, but we should double check first.
Click the “Options” tab in the top right, and navigate to the “VideoCD” tab. Make sure “Add CD-I Application” is checked.
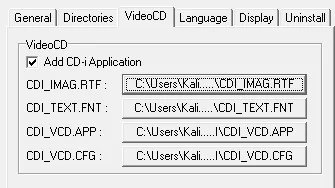
The 4 files we need will be located within the “CDI” folder of your VCDGear folder. Click each box and locate the correct file from within the “CDI” folder. Once done, click “OK” to save. We only need to do this the first time we launch the program.
Once the settings are correct, go to the “Video-CD” tab at the top.
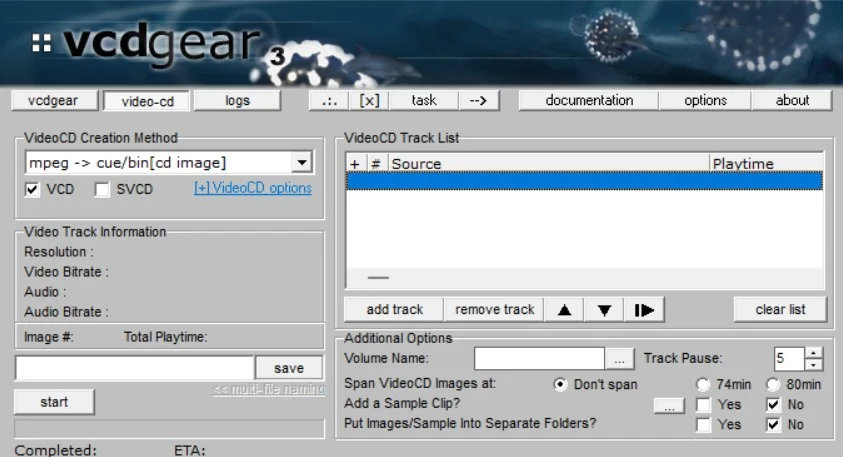
Click the “add track” option, and navigate to the file that TMPGEnc spit out. When it opens, it should automatically read your bitrate settings.
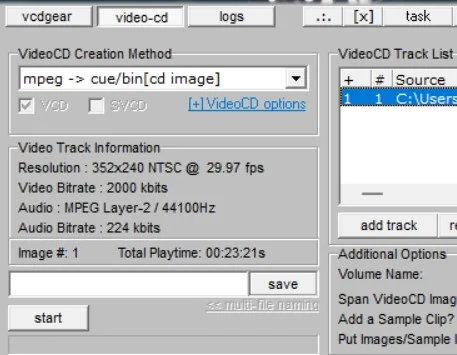
Once loaded in, click the “save” button in the bottom right. This is where your bin/cue will be saved – the files we’re burning to CD! Once you have the location, click “start” and wait for it to finish!
Finally, on to the final step – CD Burning!
Step 5:
Insert a blank CD-R in to your CD/DVD drive. You can pick up a CD/DVD reader/writer for pretty cheap online nowadays. Next, open up IMGBurn. You should be greeted with a simple interface.
Click “Write Image File To Disk”. This is where we’re going to burn our files created by VCDGear. Under the “Source” area in the top left, click the folder icon and navigate to the .cue file we just created. There should be 2 files with the same name – a .bin and .cue – but the .cue file, once selected, will include our .bin file in the burn with appropriate settings. Double click the .cue file to open it in IMGBurn.
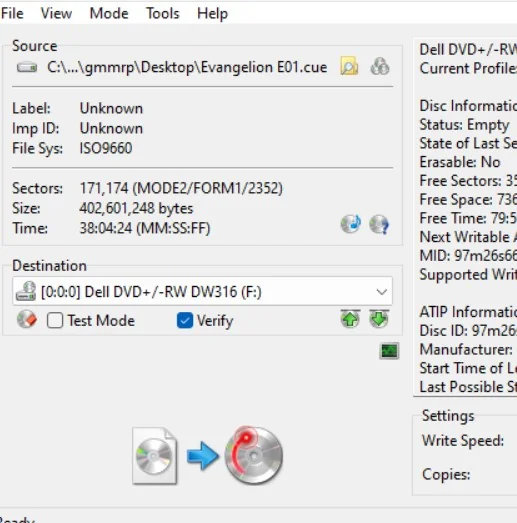
Once selected, you can configure your write speed. It’s always recommended to use the slowest possible speed. Now just click the bottom left icon to burn it to the disc! If you’d like the ensure no errors, you can set the write speed on the right side to the minimum. It usually works fine on default settings.
Once it’s burned, pop it in to your Sega Saturn or VCD Player and enjoy the movie/show!!
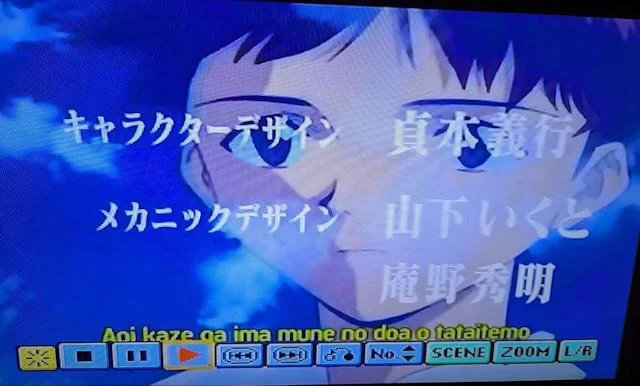
If your video is distorted/skips around, you’ve used too high of a bitrate. Try again on a lower setting! If it’s a black screen, try with a different bitrate as well.
Thanks a ton if you’ve made it this far!! This has been tested to work with 2 of my JP saturns, after 2 entire days of trial/error and using outdated/wonky programs. I don’t have a VCD Player but these files, if encoded at 1150kbps, will work on any regular VCD player as well. Higher bitrates should also work on SVCD systems, as well.
Let me know if you decide to try this out for yourselves, and make sure to refer people to this guide in the future instead of sending them some obscure “I used Nero!” message – Nero and a lot of these programs don’t support VCD anymore.
If you have any errors or questions, feel free to ask and I’ll try to troubleshoot as well.
PLEASE CLICK HERE TO VISIT THE ACTIVE REDDIT THREAD TO ASK QUESTIONS OR POST THANKS!